This recipe was submitted by one of our readers, just like you.
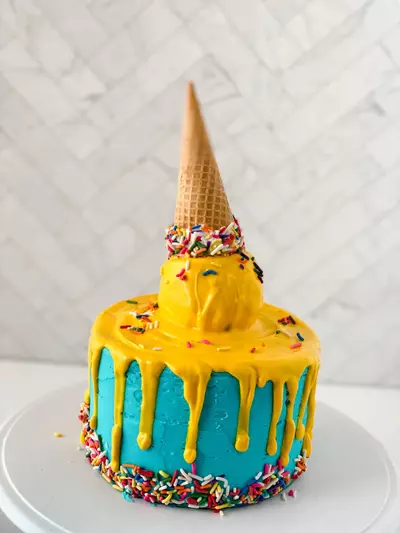
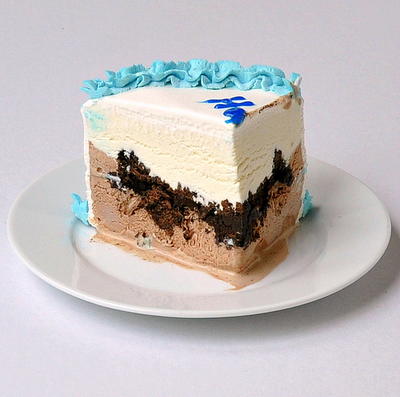
Diy Dripping Ice Cream Cone Cake

Diy Dripping Ice Cream Cone Cake
"Stun your friends and family with a gorgeous homemade Ice Cream Cone Cake. This yummy cake with ice cream cone “melting” down the sides is a gravity-defying treat you won’t forget! If you are intimidated like I was, stick with me! It looks tricky, but this ice cream cone drip cake is so doable, even if you haven’t made many cakes! There are quite a few steps but they are pretty simple. I’ve got everything you need to know below."
Preparation Time45 min
Cooking MethodGrilling
Ingredients
- pre-baked round cake
- Vanilla buttercream, colored blue
- 1 sugar ice cream cone
- Candy melts, in desired colors
- White candy melts
- Sprinkles
- 2-4 pre-packaged Rice Krispie Treats OR cake pop dough
-
To make your ice cream cone cake, start by baking your cake and letting it cool.
-
Prepare your frosting and gather all your other materials.
-
Melt the white candy melts according to the package directions.
-
Pour some sprinkles on a plate or shallow bowl.
-
Dip the rim of the sugar ice cream cone in the white chocolate and immediately dip it in the sprinkles. Set aside to dry.
-
If you are using Rice Krispie Treats, form a ball with your hands. If you are using cake pop dough you can freeze it and use an ice cream scoop to get a more realistic effect. Set aside.
-
Next, you’ll want to get your cake ready. Start by placing some buttercream on a cake board and press a layer of cake on top.
-
Fill the cake with buttercream or your choice of filling and place the second layer on top.
-
Cover the cake in a layer of buttercream and smooth it out as best as you can.
-
Press sprinkles around the bottom rim of the cake.
-
Place your ice cream cone cake in the fridge to set for 10 minutes.
-
Next, you’ll want to make your drip. Melt the colored candy melts according to the package directions.
-
Place the “ice cream” ball in the center of the cake.
-
Use a spoon to pour the chocolate onto the ball and coat it completely. Let the drops of chocolate fall on their own onto the cake.
-
Place the ice cream cone upside down on the ball slightly tipped over.
-
Pour the remainder of the chocolate into a piping bag and cut a small hole in the end.
-
Squeeze the chocolate along the edges of the cake, allowing it to drip naturally down the cake all around the sides.
-
Use a spoon to smooth out any gaps of chocolate and your ice cream cone cake is ready to go!