This recipe was submitted by one of our readers, just like you.
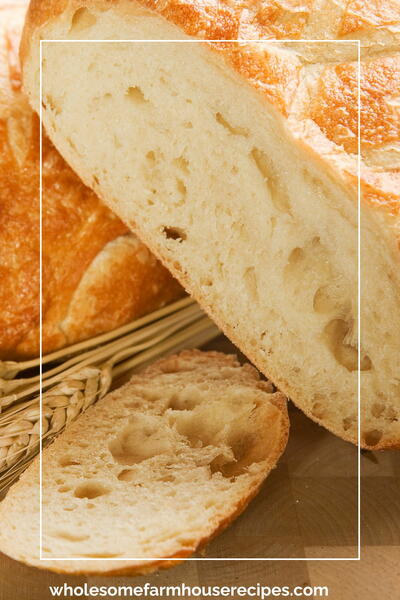
Black Pepper and Olive Oil Homemade White Bread

"Autumn is here in full swing, Christmas is very close, what could get better than the bread baking smell in your kitchen? Well, yeah a brownie maybe?! Hmmm, maybe, for me baking bread stands high and clear at no 1 on the podium. A winner every time. It is not only the baking but it is making it, the kneading, the proofing, the whole process of the bread making it’s just so satisfying. It definitely gives me a total inner satisfaction, joy and happiness. Baking bread…. is awesome The smell of baking bread it’s the best. I am very sure it has to do with my childhood experience (oh, here we go again) of grannies or my mum making it, we were jumping up and down with joy. Childhood is such a lovely time, especially when brings back many good and truly nice memories. It’s unique."
Notes* Servings really depends, but it makes approximately two 2lb loafs of bread or 3 smaller. It can be baked in loaf tins (I used 2x 2lb glass 28cm cake moulds) but cast iron skillets, cake tins or simply freely on a tray could also make some beautiful little buns.
Why You'll Love This Recipe
The Black Pepper and Olive Oil Homemade White Bread recipe is truly a kitchen delight. The combination of black pepper and olive oil adds a subtle yet flavorful twist to the classic white bread recipe, making it perfect for any season. As the aroma of the freshly baked bread fills your kitchen, it creates a warm and inviting atmosphere that brings back memories of childhood joy and happiness.
The process of making this bread is not only enjoyable but also rewarding. From kneading the dough to watching it rise and finally baking it to golden perfection, every step is a labor of love that results in a delicious loaf of homemade bread. The satisfaction that comes from creating something with your own hands is unparalleled, and this recipe offers just that.
Whether you are a seasoned baker or just starting out, this recipe is sure to bring a sense of accomplishment and pride. The simplicity of the ingredients and the clear instructions make it a foolproof recipe that anyone can master. So why not roll up your sleeves, dust off your apron, and get ready to experience the joy of baking bread in your kitchen?
Next time you're looking for a wholesome and satisfying baking project, give this Black Pepper and Olive Oil Homemade White Bread recipe a try. It's a delicious treat that will fill your home with the comforting scent of freshly baked bread and leave you with a sense of gratification that only homemade bread can provide. Happy baking!
Serves2
Preparation Time1 hr 20 min
Chilling Time15 min
Cooking Time45 min
Ingredients
- 1000 g strong white flour
- 650 ml water luke warm
- 3 tsp seasalt or pink Himalayan
- 30 g fresh yeast *
- 60 ml olive oil
- 1 tbsp cane sugar
- 1 tbsp freshly ground pepper
Instruction
-
Sift the flour into a larger bowl, add the salt the pepper and make a well in the middle.
-
Into a mug put the sugar, the yeast, and cover with 150-180ml lukewarm water (part of the 650ml water needed). Mix well until the sugar and yeast have dissolved. Pour this into the well and allow it set aside for a few minutes until the yeast water begins to bubble up.
-
Add more of the lukewarm water and start mixing by hand or a strong wooden spoon until it forms a soft dough. I always use my hand and I keep it in the bowl. It is easier with the water and oil gradual addition.
-
Knead the dough by hand either in the bowl or on a super clean and lightly floured surface for about 10-12 minutes adding the oil little by little until the dough becomes smooth and pretty elastic. The best indicator that dough has had enough kneading is when the hand(s) come clean and dough no longer sticks to the hand.
-
When finished place in a clean bowl shaped into a large sphere and cover. I keep into the same bowl I have worked in as this becomes super clean till the end. Cover with a clean kitcken towel and allow it to rise in a warm place for about 40-45 mins until it doubles in size. If it’s not warm enough it will take longer to rise.
-
When risen to double its size, split the dough into two exact amounts. Shape the dough into desired shape and place into the two oiled tins. I normally do a plat. Allow again to rise in a warm place, covered for 15 mins. Preheat the oven at this stage at 180C.
-
Bake the loafs at 210C/fan assisted or 230C for 15 min and then at 180*C for another 20-25 mins until golden brown - do the skewer test and if it comes out clean, it’s done!
-
Take out of the oven and then 3-4 min later take out of the tin and cool on a wire rack.
-
Allow to cool completely before cutting it. I normally leave it out covered with a kitchen towel for a good 4-5h or even overnight before cutting and freezing.
-
Having said this, no one can stop you having some warm bread with some salted butter or your favourite topping but you will have to tear it while still warm. Hard to resist it, I know! Enjoy